This one might get a bit long so instead of trying to write an intro I’m just going to jump into exactly how I made these. Heads up, I did use a few of the fancier tools I own for this build.
Starting with the tools and materials I used. I started by making a fan blade design using Blender (a free/open source 3D modeling software), the file will be included at the end. My fans were printed in PLA filament, it took an entire roll to print the number of blades I wanted. My fan blades were printed on a CR 10s Pro V2 which has a 30cm x 30cm build plate you could print them on a smaller printer, however, anything much smaller will affect the size at which you can print the fan blades. Additionally, I used some woodworking clamps, quick-dry super glue, masking tape, and a random orbit sander (you can hand sand if you don’t own one of these, but I will include a few notes about how to use this tool without wrecking your prints later), a sandable primer that bonds to plastic (I like Rust-oleum painters touch 2x ultra cover), acrylic paints, top coat such as artist’s gloss, narrow ribbon, and one chicago screw for each fan you plan on making.
Printing
Starting with printing the actual blades, I laid them out 3 at a time, flat on their largest face, on my print bed (I could have fit 5 at a time but build plates tend to heat less evenly near the edges so I didn’t want to risk that). I set them to print 4 shells in my slicer software (that’s a 4.8mm outer layer on all sides), then I unlocked the sizing ratio and free-scaled them, 28cm long, and their Z axis to about 4mm. This setup is good for a few reasons first is that the grainline runs parallel to the largest face, if a print is going to snap it will almost always snap on a layer line, so making sure the layer lines run parallel to the largest face, will produce the strongest print. Next, you’ll notice that 4mm is less than the 4.8mm that my shells were, this means that instead of being hollow with infill, they were solid the whole way through. I also printed with a raft, because I just get more consistent results that way, if you prefer printing without one, that’s fine.
As I was printing, I took time to lay out all the blades and, essentially trial different sizes, I settled on 12 blades for each fan, 10 or 11 both looked just as good, but 12 was divisible by 3, and I was printing 3 at a time and decided that I may as well use all of them. It took me around a week to print all of them.
Sanding
So as mentioned above I used a random orbit sander for this, you can do it by hand too, it just takes longer, but I’ve got a couple helpful tricks that will make either method easier, as well as a few tips for the power sander specifically. So the first trick, that is really helpful, whether you use a sanding sponge, sanding block, or a power sander, is to secure your parts to the craft table. I pulled my cutting mat up to the edge of the table to protect it, placed the fan blade with one end at the edge of the table as well, and then used my clamps to attach the fan blades to the table. This mostly worked really well, but they did like to slide around at the opposite end from the clamp a little more than I liked, also plastic dust would get underneath the blades and with enough friction re-adhere to the back sides that I had already sanded and add surface imperfections. This is where the masking tape and quick-dry super glue come in to save the day. One piece of masking tape goes on the bottom of the fan blade the side that faces down to the table, the second piece of masking tape goes on the table, and then you effectively superglue the fan blade to the table by putting a couple drops of superglue on the masking tape that is on the table and then putting the taped side of the fan blade down into that super glue. So with the blades clamped, and glued to the table, I was able to go at them with my power sander on its lowest setting, just keeping watchful of when anything starts to get warm and switching to a different blade whenever they did. Once all 24 blades were thoroughly sanded smooth, I was able to move on to primer.
Priming
Before priming, I filled a wash basin with water and a little bit of dish soap, just to clean all the plastic dust and any residues left over from the tape off of the blades, then dried them with an old tea towel. Next, I laid them all out on some cardboard on my balcony, put on my respirator, and sprayed them all down with the primer. Let those dry a couple hours before adding a second coat, then let them dry overnight, before flipping them over and repeating the process. At this stage they were still not completely smooth, so once they were dry I did hand sand away some of the excess primer, where it built up over the few remaining ridges, to make the blades appear even smoother.
Painting
When I painted mine I did use spray paint for the first coat, but I ended up not really liking how it looked and putting acrylic paints on top anyway, you can really use whatever you like best for this part as long as you’re happy with how it looks in the end. I did not do anything special here. After I finished painting all 24 blades, I top coated them with Mod Podge (we’ll talk more about how I feel about my top coat choice for this project later) and let them dry a couple days before assembling.
Assembly
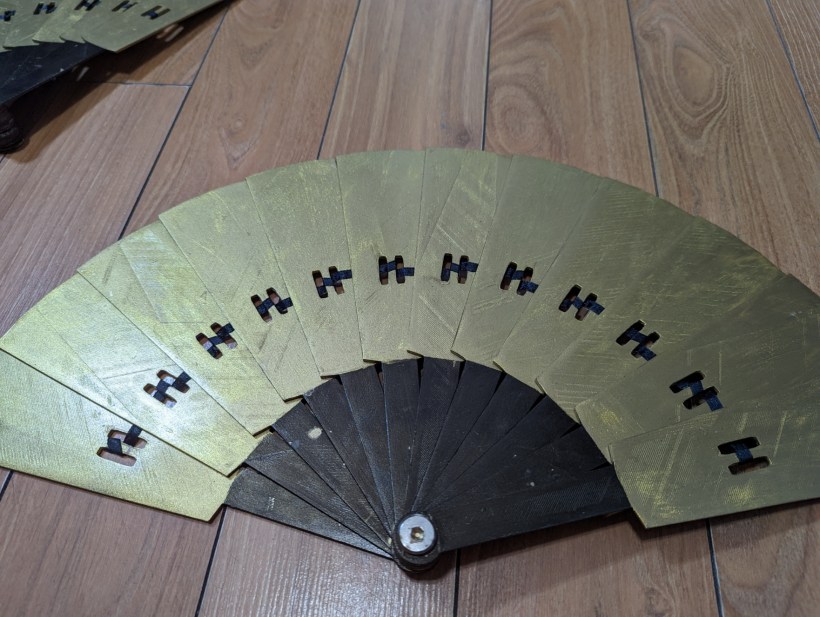
Finally, after almost 2 weeks, we got to put them all together! So first I grabbed those chicago screws and stacked all my blades for the first fan onto one of them, and screwed on the cap. We were lucky that our stack of blades was just the right height for our screw, but we were prepared to cut the screw shorter with a hack saw if it was too long. Next, I got out my ribbon and some more of that quick dry super glue and figured out a wrapping pattern that would allow the blades to open and close fully. I’ll show a close-up of what that looked like, you don’t have to do it the same, but there are a few important things that will ensure they have full motion. The first is, that when the ribbon runs from one blade to the next, it should sandwich between the two blades, if it goes around the outside of either blade, the fan will either not shut the whole way, or have big gaps when it’s open.
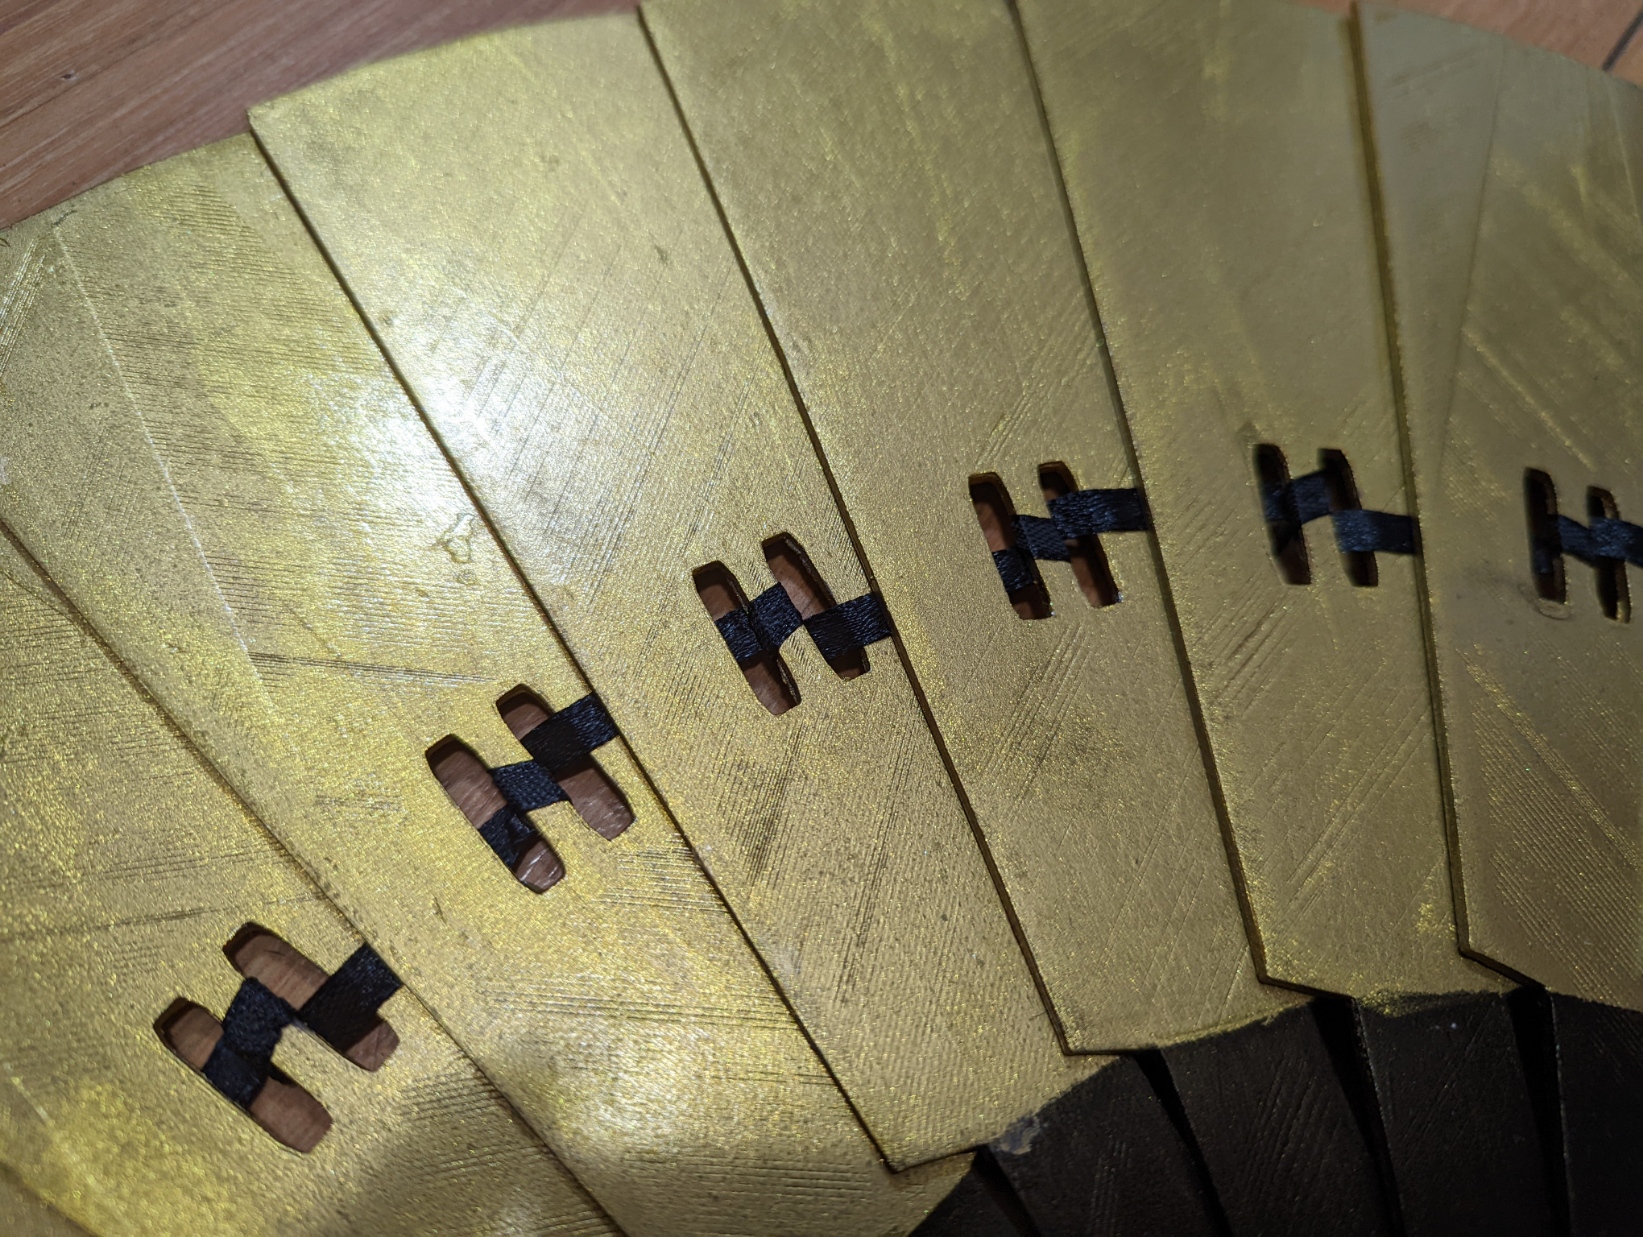
So to attach my ribbon, I would use a drop of the quick dry super glue on the center spindle between the two holes, press the ribbon down into it, and wrap around behind that same spindle coming up from the back, so that the ribbon will thread between that blade and the next, where you first position the blade the exact distance you want it to be from the first while open then repeat. Note that I alternated between wrapping upwards and downwards so that the ribbon could stay fairly straight. Lastly, I flipped it over and added an extra drop of super glue to all of the loose ribbon connections.
Thoughts After Cosplaying With Them:
Something worth noting is that these are heavy, my shoulders were sore and my hands were crampy from holding them up. They do look excellent in photos though. I’m not completely happy with my choice of top coat. I used Mod podge, frankly, it wasn’t a great choice for this project, it did not cure hard enough, so it didn’t really achieve the goal of protecting my paint job the way it should have, artist’s gloss or a spray on top coat would have been a better choice this time around. Additionally, I did have to tighten my screws frequently throughout the day, I plan to add some thread-locking glue to them for the next time I use these props. Also, I plan to always carry a bit of that quick dry super glue in my repair kit as one ribbon joint did break and allow a blade to slide out of place while I was using it. I had the glue with me that day but it was so hot out that the glue would not dry properly to fix it, but on most days this would not have been an issue. I just kept that particular fan shut most of the time after that, and there were still lots of cool poses I could do with it.
STL file is available for download on Thingiverse: https://www.thingiverse.com/thing:5446587
